You just made your first Custom Editor and you're thrilled!
Everything looks how you want it to look, it appears to be working.
Happily, you quit Unity, and next time you start it up you get that look of horror on your face - all data is gone.
This is because of the most common mistake that people are making:
They're modifying the data in the script itself, instead of in the serialized Object.
So in this short guide, we will cover a simple example:
1. We will create a script with an Enum that defines different things
2. We will create a custom Editor in which we will control which field is visible based on the selected value of the Enum field in the Inspector.
Creating the basic Script
To start off, we will first create a simple C# behavior script that will hold our data.
This script will handle logic of an AI unit. The Unit will have the following properties:
Name,
Level,
UnitType,
BaseDamage,
WeaponType,
WeaponDamage;
public class AIUnit : MonoBehaviour {
    public enum AIUnitType { Warrior, Archer, Mage }
    public enum UnitWeaponType { Sword, Longsword, BowAndArrow, Crossbow, FireBall, Meteor }

    public AIUnitType UnitType;
    public UnitWeaponType WeaponType;

    public string UnitName;
    public int Level;
    public float BaseDamage;
    public float WeaponDamage;
}
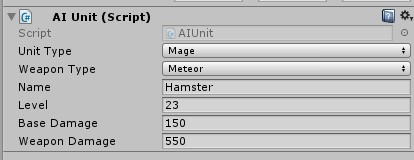
When you drag this script to a GameObject, you will see that all the variables are visible in the Inspector:

However, we want something else. Let's separate the basic data from the Weapon data in the Inspector.
We can do this using limited Attributes from the script itself however, that is bound to create messy code.
We will create a new script which will be responsible for drawing in the Inspector, and we will have full control.
Creating Custom Editor
First, we will create a folder named "Editor" in our Project.
Inside of that folder, we will create usual C# Behavior script; let's name it "AIUnitCustomEditor".
Having this script in the "Editor" folder is essential for it to work, as Unity treats Editor folders differently.
Open the Script and just bellow the last using directive, in the top, add:
using UnityEditor;Default scripts inherit from MonoBehavior, however, we don't want that in this case. So remove the MonoBehavior part after the colon and Inherit from "Editor":
public class AIUnitCustomEditor : Editor {
Finally, we will have to use this special Attribute, which will define the type that we're trying to expand:
[CustomEditor(typeof(AIUnit))]You should end up with the following script:
using System.Collections;
using System.Collections.Generic;
using UnityEngine;
using UnityEditor;
[CustomEditor(typeof(AIUnit))]
public class AIUnitCustomEditor : Editor {

	// Use this for initialization
	void Start () {

	}

	// Update is called once per frame
	void Update () {

	}
}
But ... nothing is happening! That's because the OnInspectorGUI() function is still working normally.
In order to make changes, we have to override this function and write our own drawing logic.
First, let's get rid of the Start() and Update() from our script. As we're not inheriting from MonoBehavior, we have no use for them.
Next, we have to override OnInspectorGui() function like so:
using System.Collections;
using System.Collections.Generic;
using UnityEngine;
using UnityEditor;
[CustomEditor(typeof(AIUnit))]
public class AIUnitCustomEditor : Editor {

    public override void OnInspectorGUI()
    {

    }
}
Save the script, go back to the Inspector.
Oh no! If you did everything correctly, all the fields will be gone:

If not, make sure that your script is indeed in an "Editor" folder and that you're targeting the correct type.
If you do want to draw the default inspector GUI, you can do so by calling the same function from the base class, like so:
  public override void OnInspectorGUI()
    {
        base.OnInspectorGUI();
    }
Back to the Inspector, you should see that the UI is now back, just like we never wrote the script above.
We will create a new Enum which will hold two values: BasicInfo and WeaponInfo.
Based on the selected value we will show different variables from the base script.
When BasicInfo is selected, we will show UnitType, Name, Level and BaseDamage.
When WeaponInfo is selected, we will show WeaponType, WeaponDamage.
For now, we will just create this functionality and then we will see how we can tie the values to the corresponding fields.
public class AIUnitCustomEditor : Editor
{
    public enum InfoType { BasicInfo, WeaponInfo }

    public InfoType infoType;

    public override void OnInspectorGUI()
    {
        //base.OnInspectorGUI();
        EditorGUILayout.Separator();
        infoType = (InfoType)EditorGUILayout.EnumPopup("Display:", infoType);
        EditorGUILayout.Separator();

        if (infoType == InfoType.BasicInfo)
        {
            EditorGUILayout.LabelField("Basic Unit Info :", EditorStyles.boldLabel);
            EditorGUILayout.TextField("Name :", "");
            EditorGUILayout.IntField("Level", 0);
            EditorGUILayout.FloatField("Base Damage :", 0f);
        }
        else if (infoType == InfoType.WeaponInfo)
        {
            EditorGUILayout.LabelField("Unit's Weapon Info :", EditorStyles.boldLabel);
            EditorGUILayout.FloatField("Damage :", 0f);
        }
    }
}
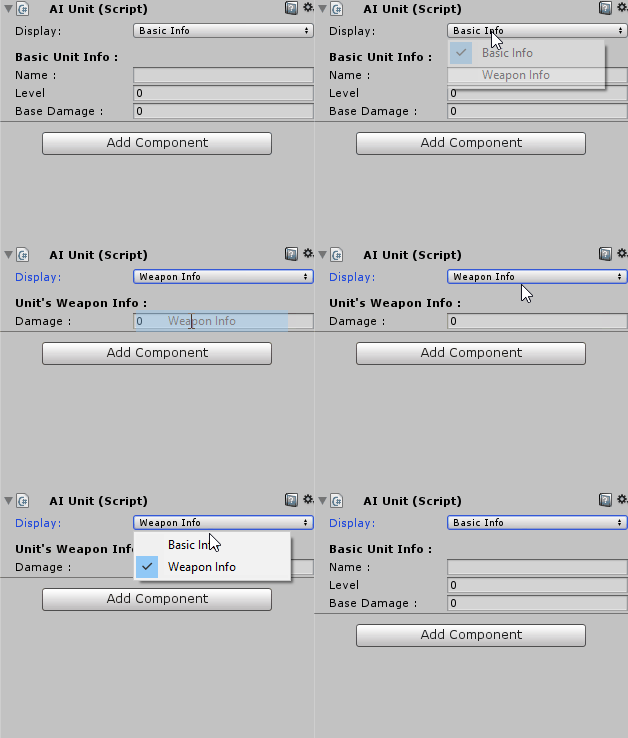
The code above gives us the following result:
It's super simple as well.
First we declare an Enum, and in the overridden function we create an EnumField. We set value of the instance to the value of the created field.
That way the value will always be the same to the value that user selects in the Inspector.
Next we have an If block, where we simply check the value of the infoType and based on that we create additional Fields.
Fields themselves are easy to understand as well.
Just like in OnGUI function that was used before UGUI for the interface, we can use EditorGUILayout, which automatically takes care of the positioning and spacing. All we have to do is choose desired field type and it will be drawn in the Inspector.
We create a field and we pass the field name and value to it.
However, if you try to modify any value right now, you will see that it always gets set to the defined value in the code.
This is because OnInspectorGUI() is constantly called and since we hard coded the values, they will maintain them when the redraw occurs.
Accessing the script object and SerializedObject
The next step is where most people make mistake. You can actually access the Script that you are expanding and many people will go ahead and set the value of a variable
from the expanded script, to the value of the GUI control. This will appear to be working at first between the Play and Edit sessions, but when you Quit Unity all data that you have set will be gone.
What we need to do is actually modify the data of the SerializedObject that Unity happily references for us automatically. This ensures that the data will stay serialized between
the sessions, alongside the Play and Edit modes. (Of course, when you modify the data in Play mode it will not be saved for the Edit mode, due to the way Unity serialization works - this is correct behavior)
First, we will grab reference towards the expanded script:
 AIUnit targetedScript;

    public override void OnInspectorGUI()
    {
        targetedScript = (AIUnit)target;
To access the serialized object, we have to look in the base class:
base.serializedObject
With this reference, we can now use FindProperty function which will expose any serializable property of the class that we're expanding. When we have the correct property, we can set its value.
base.serializedObject.FindProperty("Name").stringValue
So let's go ahead and modify our code to use the values from the serialized data. Here's one example:
base.serializedObject.FindProperty("Name").stringValue = EditorGUILayout.TextField("Name :", targetedScript.UnitName);
When we're done with all modifications, we HAVE TO call:
serializedObject.ApplyModifiedProperties();
Finally, let's go ahead and modify all of the code and see what we ended up with!
AIUnit.cs
using System.Collections;
using System.Collections.Generic;
using UnityEngine;

public class AIUnit : MonoBehaviour {
    public enum AIUnitType { Warrior, Archer, Mage }
    public enum UnitWeaponType { Sword, Longsword, BowAndArrow, Crossbow, FireBall, Meteor }

    public AIUnitType UnitType;
    public UnitWeaponType WeaponType;

    public string UnitName = "";
    public int Level;
    public float BaseDamage;
    public float WeaponDamage;

    private void Start()
    {
        Debug.Log(UnitName + " " + Level + " " + BaseDamage + " " + WeaponType+ " " + WeaponDamage);
    }
}
AiUnitCustomEditor.cs
using System.Collections;
using System.Collections.Generic;
using UnityEngine;
using UnityEditor;


[CustomEditor(typeof(AIUnit))]
public class AIUnitCustomEditor : Editor
{
    public enum InfoType { BasicInfo, WeaponInfo }

    public InfoType infoType;

    AIUnit targetScript;

    public override void OnInspectorGUI()
    {
        targetScript = (AIUnit)target;

        //base.OnInspectorGUI();
        EditorGUILayout.Separator();
        infoType = (InfoType)EditorGUILayout.EnumPopup("Display:", infoType);
        EditorGUILayout.Separator();

        if (infoType == InfoType.BasicInfo)
        {
            EditorGUILayout.LabelField("Basic Unit Info :", EditorStyles.boldLabel);
            serializedObject.FindProperty("UnitType").enumValueIndex = (int)(AIUnit.AIUnitType)EditorGUILayout.EnumPopup("Unit Type:", targetScript.UnitType);
            serializedObject.FindProperty("UnitName").stringValue = EditorGUILayout.TextField("Name :", targetScript.UnitName);
            serializedObject.FindProperty("Level").intValue = EditorGUILayout.IntField("Level", targetScript.Level);
            serializedObject.FindProperty("BaseDamage").floatValue = EditorGUILayout.FloatField("Base Damage :", targetScript.BaseDamage);
        }
        else if (infoType == InfoType.WeaponInfo)
        {
            EditorGUILayout.LabelField("Unit's Weapon Info :", EditorStyles.boldLabel);
            serializedObject.FindProperty("WeaponType").enumValueIndex = (int)(AIUnit.UnitWeaponType)EditorGUILayout.EnumPopup("Weapon Type :", targetScript.WeaponType);
            serializedObject.FindProperty("WeaponDamage").floatValue = EditorGUILayout.FloatField("Weapon Damage :", targetScript.WeaponDamage);
        }
        serializedObject.ApplyModifiedProperties();
    }
}
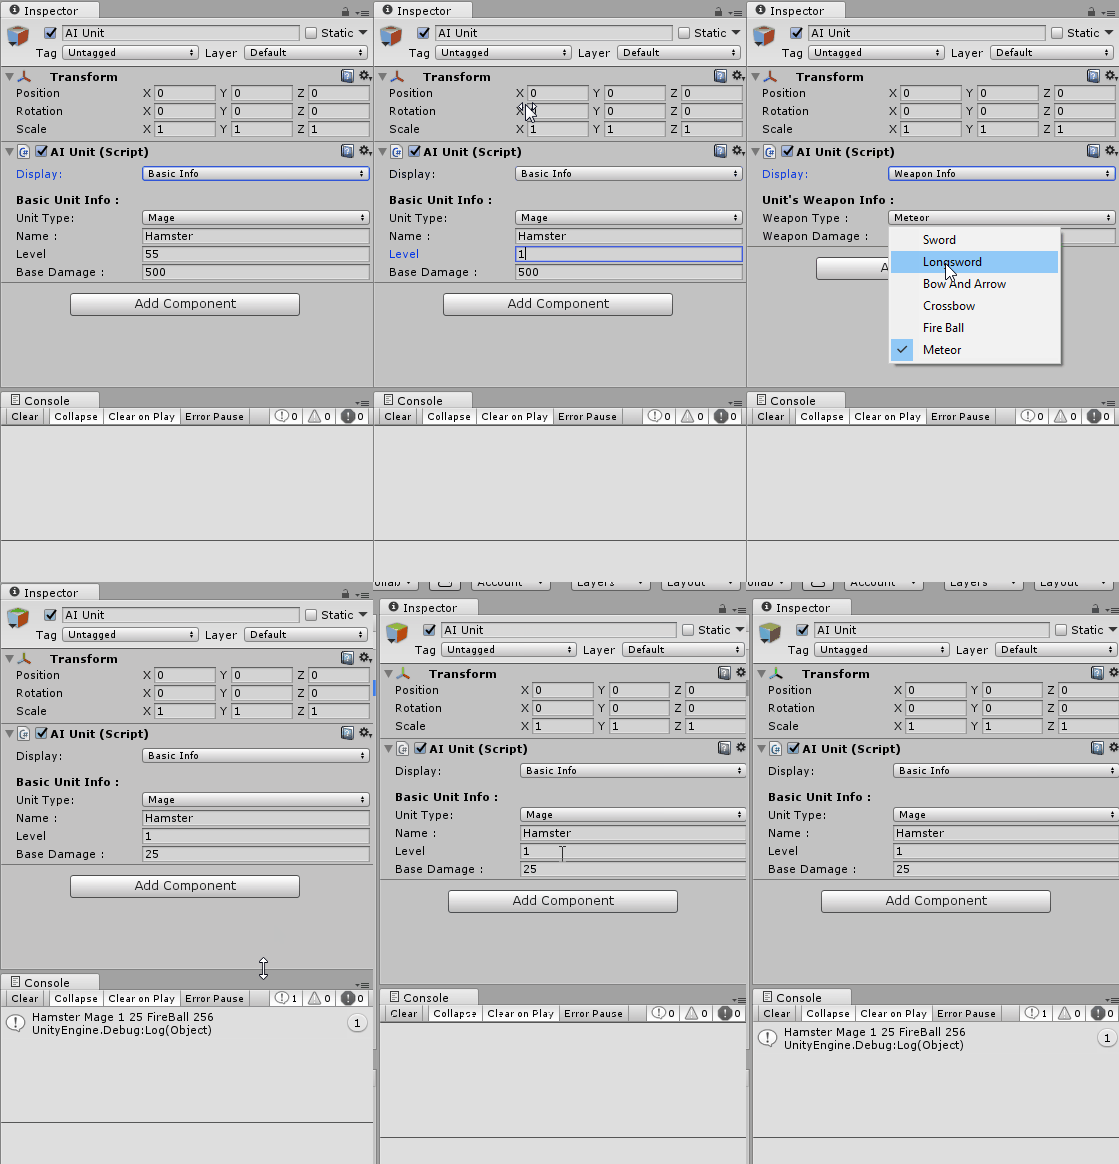
With the provided code you get the correct serialization that works in between the Play and Edit mode, as well as in between Unity sessions.

Have fun coding,
Srđan,
Founder of Digital Hamster.


